Affichage
To be successful in Live for Speed it is vital to familiarise with the cockpit gauges and on screen information. The gauges can be set up to your liking via the display menu in the options. Using [Shift]+F you can switch off all on screen information at once.
A l'écran
Mini-carte: Sur la mini-carte vous pouvez voir votre position sur le circuit ainsi que celle de vos adversaires.
Vert: Votre position
Jaune: Concurrents devant vous
Orange: Concurrents derrière vous
Bleu clair: AI devant vous
Bleu foncé: AI derrière vous
Frame rate display: L'affichage du taux d'image montre combien d'images par seconde sont dessinées . Ce taux ne devrait jamais chuter en-dessous de 30 pour conserver un minimum de fluidité. Vous pouvez améliorer votre taux de FPS (Frame per second) en reduisant un peu les détails graphiques.
Position: Le numéro jaune,en haut à gauche de l'écran,indique votre place dans la course.
Tours: 2/5 indique que vous êtes dans votre second tour,sur une course de cinq tours. Pendant l'entrainement et les qualifications,un numéro indique combien de tours vous avez parcouru.
Total: La durée totale de course effectuée.
Temps qual: Indique,en session de qualification,le temps restant avant la fin de cette qualification. Quand ce temps arrive à zéro,le texte deviendra orange. Le tour dans lequel vous êtes sera votre dernier tour chronométré.
Meilleur: Le meilleur temps au tour que vous avez effectué depuis votre dernière sortie des stands.
Tour: Votre temps dans le tour actuel.Temps remis à zéro à chaque tour.
Partiel: Le dernier partiel que vous avez effectué.
Barres de pédales:
Vert: Accélérateur
rouge: Frein
Bleu: Embrayage
Gris: Frein à main
Direction: En vue externe,un point rouge indique la position du volant par rapport à l'angle de braquage actuel (PS:j'ai pas trouvé comment bien expliquer,n'hésitez pas à corriger au cas où) .
tableau de bord
Compte-tours: Le compteur de gauche indique le régime moteur en tours par minute. Il y a un voyant rouge lumineux qui s'allumera quand monter ou descendre un rapport augmenterait le rendement du moteur(donc sa puissance). Il est possible de désactiver ce voyant dans les options.
Indicateur de rapport: Le rapport de vitesse que vous utilisez.
Compteur de vitesse: Indique la vitesse en mph ou km/h. Il peut être affiché en analogique,comme sur le screenshot,ou en digital.
Indicateur de pression du turbo: Les voitures équipées d'un turbo ont un indicateur à aiguille qui indique la pression d'air aspirée. Quand cette pression chute,le moteur bénéficie de moins de puissance.
Indicateur de temérature d'huile: Indique la température d'huile actuelle. Si le système de refroidissement a été endommagé lors d'un accident,la température du moteur augmente,et le conducteur devra faire attention de ne pas trop pousser le moteur,car ceci pourrait le détruire.Ce n'est pas codé actuellement dans la version S2 Alpha.Cela s'applique aussi à la température de l'eau.
Jauge de carburant: Indique la quantité de carburant restante. Pensez à ravitailler à temps,sinon vous tomberez en panne d'essence. Une indication numérique de la quantité d'essence restante est visible dans le menu F12.
Horloge: Quelques voitures disposent d'une horloge,réglée sur l'heure locale de Windows.
FPS: Some cars have a gauge that shows the current FPS that Live for Speed is running at. This was added mostly to fill empty space on the console in some cars.
Indicator light: An orange light indicates if the indicator or the hazard warning lights are turned on.
Handbrake: If the handbrake is engaged it will be indicated by a red light.
Pit Limiter: In cars that are equipped with a pit lane speed limiter, when the limiter is engaged it is indicated by a green light.
Traction Control: In cars that have traction control, a currently engaging TC is indicated by a rapidly flashing blue light. If TC is disabled, the blue light will be constantly shown as a warning that TC is off.
Affichage supplementaire à l' écran
F9 F10 F11 F12
En utilisant les touches F9 à F12, vous pouvez commuter entre les quatre affichages d'information temps réel concernant ; la température et l'usure des pneus, les dégats, réglage en course et stratégie au stand. Appuyez sur le bouton encore une fois pour faire disparaitre l'affichage .
Température & usure des pneus
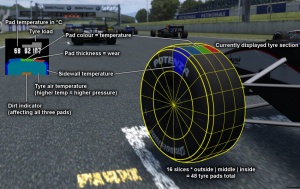
[F9] l'appuie de la touche F9 montre quatre petites fenêtres, chacune contenant un profil 2D d'un pneu ( une coupe) , quelques chiffres et trois barres grises.
Il y a six secteurs dans le profil - la bande de roulement, découpée en trois sections (extérieure, médiane et intérieure), les parois et la température d'air. Chaque secteur va du bleu sombre (section trop froide), vert (section dans la plage optimale),Brun-Orange section légèrement trop chaude et rouge (section beaucoup trop chaude, ce qui entraine une usure trè rapide et une forte diminution de l'adhérence). Il y a aussi noir, mais cela est seulement montré après un éclatement ou lors d' une crevaison. Au-dessus du diagramme du pneu, il y a une série de trois nombres, qui donnent la température exacte de cette partie de pneu. N'oublier pas que le diagramme du pneu montre seulement la partie haute du pneu qui correspond , un "plat" ( blocage de roue prolongé dans un freinage en appui par ex.) sur une roue tournant est représenté par de petit flash rouge par contre les flancs ne s'usent pas. D'autre part, sachez que le pneu éclate dès qu'une section dépasse les 200°.
En haut de chaque fenêtre il y a une série de barres grises en mouvement montrant la pression du pneu sur la route. la hauteur des barres donne une bonne idée du contact pneu<->piste. Sur la plupart des voitures, la déformation varie en fonction de l'inertie induit par le mouvement des voitures en course ( la masse se déporte sur une ou plusieur roue), afin de trouver le meilleur grip la roue doit être droite (relatif à la surface de la piste), quand les barres sont de niveau, la roue est verticale à la route.
Pour finir, nous avons une petite barre brune qui apparaît dans le diagramme de pneu, cette barre brune se réfère à la quantité de terre présent sur les pneus. La terre réduit énormement le grip, soyez donc prudent car même après une petite sortie de route il se peut qu'il faille roulé doucement sur une grande distance pour bien nettoyer vos pneus.
Damage display
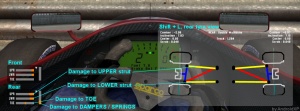
[F10] The damage display shows you if a part of your suspension is damaged. An orange bar symbolises the damage. The longer the orange bar, the more damaged your suspension is. A red bar means that a part of your suspension has completely collapsed - But probably you will already have noticed this by the behaviour of the car.
UPR: Represents damage to the upper strut. This essentially means the upper suspension arm is bent/shorter, thus decreasing your camber (more negative).
LWR: Is damage to the lower strut, increasing your camber (more positive).
TOE: Shows damage to your toe in/out setting. The orange bar illustrates in which direction the front of the corresponding tyre is pointing to. If the orange bar on the left suspension damage display points to the right, then you have more toe in, if it points to the left, you have more toe out. Vice versa for the right suspension damage display.
Spring/Damper damage: Shows how intact your damping is. If the bars become red, the damping failed completely, which you will immediately notice because your car will be jumping all over the place.
Live settings
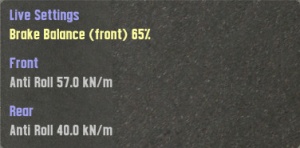
[F11] This display allows for some on-the-fly changes to your current car setup. Included are brake balance and front/rear anti-roll bars.
Note: The changes made on this display are applied (almost) immediately! So better don't fool around with the brake balance when approaching that tricky hairpin. Furthermore, not all cars can adjust all three settings. The RaceAbout, for example, has no rear anti-roll bar.
Pit instructions
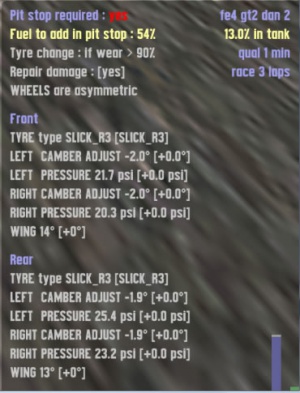
[F12] On the pit instructions display, you can set up what actions should be taken while doing a pitstop. Additionally, there is a fuel display and other generic information, for example if a pitstop is required (by racing rules) or not.
The values displayed in the square brackets [] indicate the difference to the current setting. For example, if you currently have 5° front wing and change it to 8°, the bracketed value will read [+3°]. As soon as you do your pitstop, the changes will be applied and the value reset to [+0°].
The change instructions include:
Fuel load at pit stop: Sets the (percentage) amount to which your tank will be filled when doing a pitstop. If the current fuel amount is bigger than this value, no action will be taken.
Tyre change if wear > X%: Sets the amount of how much a tyre must be worn before it will be changed. If you set it to 10%, then even a slightly worn tyre will be changed, if set to 90% the tyre must have almost no tread left before it gets replaced. Additional options are 'always' and 'never'.
Wheels are symmetric/asymmetric: Defines wether you want to edit the front/rear wheels in a symmetric fashion or not. If you choose asymmetric, you can also edit the left/right side independendly.
Tyre type: Change this if you want to mount a different type of tyres. See tyre types for more information.
Camber adjust: See camber adjust.
Pressure: Sets the tyre pressure.
Wing: (only on cars with downforce) Sets the angle of your wings. See downforce.
Please note that depending on the car you drive, some of the options seen on the screenshot might not be available. For example, on non-downforce cars, there is of course no wing adjustment.
G-Forces
At the bottom of the screen right in the middle you will see figures showing the actual lateral and longitudinal acceleration. Lateral acceleration is on the left and a small triangle shows if the acceleration is to the left or the right side. The longitudinal acceleration is on the right side and a triangle shows the direction of the acceleration here too.
Race position list
Shows your position in the race as well as the position of your opponents. At the end of each sector the gap between you and your opponents will be displayed.
Suspension
[Shift + L] Pressing this key combination will bring the suspension display to the screen. This is a schematic diagram of the car's suspension which is updated in real time so you can view the suspension work through corners and over bumps. This display will also reflect if your car uses a Double Wishbone, Mac Pherson or Trailing Arm suspension.
Latency/Lag bars
They display the amount of latency between you, other players and the server.
Technical: The blue and green bars (which move quickly) represent the number of "game packets" that have been already sent by each player but have not been "used". The "game" only eats game packets when it has them for all players, this is how the game model stays in sync. Going from left to right it starts with the host, then guest1, guest2 etc (as seen in the N list of connections). The green one is your own. When one player lags, you will see his reserve packets are at zero, and everyone else's go up and up at that point, while the game is not able to process game packets. The grey bars are the average of the other players bars, as seen by the other players, and transmitted to your pc for info. Note : car positions come in "pos packets" not game packets - pos packets are not "in-sync" and are processed immediately. How to read the coloured bars:
- all jumping up and down nicely, all have good connections.
- one player keeps getting stuck at the bottom (others rise) then recovering - intermittent lag from that player to host.
- all keep getting stuck at the bottom and only your green one going up - intermittent lag between you and the host (you aren't getting the other players' game packets).
- extreme of (2) that player will time out.
- extreme of (3) you will time out.
- all bars going half way up the screen way above the red zone – bug!


